Hey everyone, did some searches of the site and couldn't find a whole lot regarding these acrylic tanks. I just wanted to see if I could get some opinions on the regular and/ or Systems 2 SeaClear tanks? Anybody have one and use it for a ceph tank? If so what is your current setup? I was thinking about getting a 55 gallon SeaClear to start my build for a ceph tank but wanted to get some advice first. I'm also still trying to decide between a glass or acrylic tank in general. Thanks in advance!
-
Looking to buy a cephalopod? Check out Tomh's Cephs Forum, and this post in particular shares important info about our policies as it relates to responsible ceph-keeping.
You are using an out of date browser. It may not display this or other websites correctly.
You should upgrade or use an alternative browser.
You should upgrade or use an alternative browser.
Thoughts on a SeaClear tank for cephs?
- Thread starter Pyrosnowman
- Start date
I think it should work just fine. I don't see any issues. 
I have both acrylic and glass tanks. If I was going to replace one of them (I certainly don't NEED another  ), it would be a hard call.
Acrylic is much easier to work with if you have to drill it or want to make modifications but it scratches easily. The OUTSIDE is not the problem, it is the live rock, critters and cleaning on the inside that cause issues. You will read that you can remove the scratches. This a half truth as it is a huge amount of work for even a small area (that grows pretty large as you work) and has to be done on an empty tank. Glass tanks DO scratch and they cannot be buffed but it is harder to scratch them and far easier to clean them. Most glass tanks have seams that eventually have to be stripped and re-siliconed at some point (some last more than 10 years without needing this). Seams can be compromised during cleaning and it does not take long for algae to work its way between the silicone and the glass. Trying to remove it can lead to compromising a seam.
The empty tank weight, is significantly less with acrylics for smaller tanks so if you expect to move it from time to time and/or won't have help setting it up (you still need to support the weight of the water so support is not a primary issue in choosing at this size), then this may be a deciding factor. For a really large tank, I would choose acrylic for this purpose but at 55 gallons it is a toss up.
Photography is another consideration but, here again there are pros and cons. Acrylic tends to distort but glass reflects light. My images will often show the photographer as well as the subject (I don't use flash often) when I am trying to photograph animals in the glass tanks. Avoiding distortion from the rounded corners of an acrylic can be a problem. The most important thing I have learned for either type tank is to use a tripod, not to avoid photographer movement but also to find the best location to shoot each tank.
Not a lot of help but hopefully I added a few considerations that will give weight to one or the other.
), it would be a hard call. Acrylic is much easier to work with if you have to drill it or want to make modifications but it scratches easily. The OUTSIDE is not the problem, it is the live rock, critters and cleaning on the inside that cause issues. You will read that you can remove the scratches. This a half truth as it is a huge amount of work for even a small area (that grows pretty large as you work) and has to be done on an empty tank. Glass tanks DO scratch and they cannot be buffed but it is harder to scratch them and far easier to clean them. Most glass tanks have seams that eventually have to be stripped and re-siliconed at some point (some last more than 10 years without needing this). Seams can be compromised during cleaning and it does not take long for algae to work its way between the silicone and the glass. Trying to remove it can lead to compromising a seam.
The empty tank weight, is significantly less with acrylics for smaller tanks so if you expect to move it from time to time and/or won't have help setting it up (you still need to support the weight of the water so support is not a primary issue in choosing at this size), then this may be a deciding factor. For a really large tank, I would choose acrylic for this purpose but at 55 gallons it is a toss up.
Photography is another consideration but, here again there are pros and cons. Acrylic tends to distort but glass reflects light. My images will often show the photographer as well as the subject (I don't use flash often) when I am trying to photograph animals in the glass tanks. Avoiding distortion from the rounded corners of an acrylic can be a problem. The most important thing I have learned for either type tank is to use a tripod, not to avoid photographer movement but also to find the best location to shoot each tank.
Not a lot of help but hopefully I added a few considerations that will give weight to one or the other.
I have spent a lot of time reading about the pros and cons between glass and acrylic and honestly photography was something I hadn't even thought about, which I'm glad you brought it up! I currently live in an apartment and one reason I liked the idea of acrylic so much was because it is less likely to just explode all over the floor, or so I've read. It would mean one less thing to constantly think about. However, scratching on the inside of an acrylic tank could be a major pain to deal with but what is the likelihood of that happening? Have you had experience with noticeable scratches and if so what was the cause of them? A lot of really good information, I appreciate it!
Acrylic does scratch pretty easily and is usually a result from cleaning or landscaping....such as moving rocks around and bumping into the side will cause scratches. also when clean the tank with a scraper/cleaner magnet/brush it is very easily to get sand caught in ones chosen cleaning device which causes scratches......quick note, I've seen or heard of an glass aquarium exploding apart. that being said I have heard stories of people hitting them Extremely hard with something by accident, such as practicing a golf swing to close to the tank. And i have heard one story where the stand actually fell apart and the tank fell to the ground, but did not break. Glass aquarium as pretty stong, I had one in a high traffic area of mu house and people and things bumped into or hit it all the time and it never broke. All my tanks are glass and all my sumps/refugiums are acrylic
I can think of two instances where our members lost glass where an acrylic would have survived. Thales (I think) was playing ball with his young daughter and discovered she had a great arm and CORW314's bedroom hex tank's seams leaked and soaked the bed. There is also a rather fantastic video of a large tank being crashed at a pool party (may have been staged). I could not find the one I was thinking about and this one is definitely staged but funny enough to post:
CaptFish brings up an aside that you may not have yet learned. Marine tanks, and especially tanks for octopuses, do best with a secondary tank that holds the filtration and additional water. This sump is usually set below the display, gravity fed and water pumped back from holes drilled and plumbed between the two. This tank can be as cheap as a heavy duty garbage can but most people use an aquarium, often the one they are replacing with the next bigger tank ().
I would lean toward acrylic if you are living in an apartment (note my comment about moving) for both the weight issue and the leak potential. If an acrylic tank does not leak at the seams (bottom, and sometimes one side) it will likely never develop a leak as the seams are created by an acrylic bonding process rather than silicone gluing.
Also a cautionary note, marine tanks are much messier than FW tanks and your apartment will likely have carpet. Do some research on what you can do to protect the carpet (and wall behind the tank) to keep from losing your deposit. Where is your tank and does it make a mess may be a bid discouraging but may give you some ideas. If you have the option to put it in the kitchen, consider it a best choice.
Be sure you use acrylic safe ONLY scrapers. If it does not say this, don't use it. Dave also brings up the sand scratching the tank problem, one of the biggest ways you can scratch BOTH kinds of tanks.
CaptFish brings up an aside that you may not have yet learned. Marine tanks, and especially tanks for octopuses, do best with a secondary tank that holds the filtration and additional water. This sump is usually set below the display, gravity fed and water pumped back from holes drilled and plumbed between the two. This tank can be as cheap as a heavy duty garbage can but most people use an aquarium, often the one they are replacing with the next bigger tank (
).I would lean toward acrylic if you are living in an apartment (note my comment about moving) for both the weight issue and the leak potential. If an acrylic tank does not leak at the seams (bottom, and sometimes one side) it will likely never develop a leak as the seams are created by an acrylic bonding process rather than silicone gluing.
Also a cautionary note, marine tanks are much messier than FW tanks and your apartment will likely have carpet. Do some research on what you can do to protect the carpet (and wall behind the tank) to keep from losing your deposit. Where is your tank and does it make a mess may be a bid discouraging but may give you some ideas. If you have the option to put it in the kitchen, consider it a best choice.
Be sure you use acrylic safe ONLY scrapers. If it does not say this, don't use it. Dave also brings up the sand scratching the tank problem, one of the biggest ways you can scratch BOTH kinds of tanks.
You are both so fantastic, I can't thank you enough for the information! I did hear that sand was the leading cause for causing scratches in any type of tank and that usually people picked it up unknowingly on the scrapers/ cleaners. Have to say as well I did get a kick out of that Yellow Pages commercial! I was leaning towards acrylic mostly because of the fact that I'm in an apartment and it would be less likely to have a problem down the road if there wasn't an issue initially. I realized that I totally forgot to mention that I'm interested in building an octopus tank. I did do some research on sumps and I think that is the route I plan to go, especially if it's better for the octopus. Is there really that big a difference between buying a sump, such as the Aqueon ProFlex <Aqueon>, or just using a small aquarium? Do you have any preference or is it cost/ efficiency better? Regardless if I used a sump would my only option be to drill the tank for an overflow or is that just preferred? Thanks in advance! And in the meantime I'm going to get some research in for protecting my walls and carpet!
EDIT:
I had another question as well regarding escapes. Do you think it would be harder to secure the top of the SeaClear than a different type of acrylic tank or glass tank? Any suggestions on other brands of acrylic tanks? Thanks!
I did hear that sand was the leading cause for causing scratches in any type of tank and that usually people picked it up unknowingly on the scrapers/ cleaners. Have to say as well I did get a kick out of that Yellow Pages commercial! I was leaning towards acrylic mostly because of the fact that I'm in an apartment and it would be less likely to have a problem down the road if there wasn't an issue initially. I realized that I totally forgot to mention that I'm interested in building an octopus tank. I did do some research on sumps and I think that is the route I plan to go, especially if it's better for the octopus. Is there really that big a difference between buying a sump, such as the Aqueon ProFlex <Aqueon>, or just using a small aquarium? Do you have any preference or is it cost/ efficiency better? Regardless if I used a sump would my only option be to drill the tank for an overflow or is that just preferred? Thanks in advance! And in the meantime I'm going to get some research in for protecting my walls and carpet!EDIT:
I had another question as well regarding escapes. Do you think it would be harder to secure the top of the SeaClear than a different type of acrylic tank or glass tank? Any suggestions on other brands of acrylic tanks? Thanks!
Last edited:
There are several top ideas in this forum that give great ideas for securing the top. I am not sure what the top of the Seaclear looks like. I have found that acrylic tanks that have a fixed top (ie, the top is not open to the edge but has support the fully surrounds the opening and has holes cut for access) to be extremely easy to octoproof with a bit of DIY effort. On my fully open tops, I create an acrylic surround to make the same type of access. Check out the links in the How To sticky at the top of this thread.
I will ALWAYS drill a tank vs using a siphon overflow. Dave has used the overflow system for a long time without major issues but I have had the opposite experience and won't use the siphon method. I find them less messy but you DO have to be sure all bulkheads are well sealed (easier with acrylic tanks, silicone can always be used as a last resort).
I prefer an open sump, using an old (either one of my own or a purchased used). I find the store bought variety to be smaller than I want for the space and more trouble to change the filter. The advantage to a store bought is the hood for the gravity feed to the tank as it does minimize mess (but is a chore to deal with for changing out the filter sock)
The Tank Buildouts thread (pinned to the top of the forum) has a list of tanks linked with a variety of configurations. Check out my Going Larger thread for pictures of some of the ideas I am suggesting.
Addendum on skimmers. You will want a skimmer that can be run INSIDE your sump to keep any overflow off the floor. Most can be placed inside or outside but be sure you check and that you allow room for one in the sump. Height is the other consideration. The skimmer cup must be removed to clean it and many skimmers need 2" or more above the cup for removal. I don't own a high end skimmer but can recommend Coralife for a low end model. Of the 5 or so low to medium-low units I have purchased, these are by far the best. They have a very short additional clearance requirement (about .5"), are easy to adjust, stay adjusted, visibly collect protein and are sized appropriately (you need to double the specified tank requirements for most low end units). IMO, a skimmer is necessary and can save an animal's life with an inking incident.
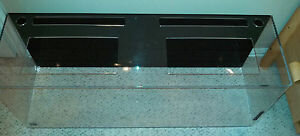
Sorry for the late reply! Unfortunately life just had to take over for a short time. I believe the top on the SeaClear is just two cut outs on top and looks like the photo I have attached. I really like the idea of drilling the tank and of course it would be a lot easier doing that on an acrylic tank. I just need to do more research on drilling and where to drill exactly to be sure I don't make any mistakes as the tank isn't cheap. If drilling the bottom of the tank is common then the stand would need a place for the piping to run and that would be one more thing to add to my research list!
For the sump do you find some methods work better than others? And by that I mean specifically do you use wet/dry, refugium setup, etc. over something else? I'm not sure how many different ways you can do it, but I would like to know which is most efficient if you or anyone else believes one method is superior. Thank you as well for the thread suggestions all the information has been incredibly helpful!
Thank you as well for the skimmer reply with very thorough information. That has saved me quite a bit of reading time!
For the sump do you find some methods work better than others? And by that I mean specifically do you use wet/dry, refugium setup, etc. over something else? I'm not sure how many different ways you can do it, but I would like to know which is most efficient if you or anyone else believes one method is superior.
Thank you as well for the thread suggestions all the information has been incredibly helpful!Thank you as well for the skimmer reply with very thorough information. That has saved me quite a bit of reading time!
Attachments
DO read as much info as you can on hardware as I am NOT a hardware expert and tend to keep as simple a tank as I can get away with. I likely pay more attention to maintenance and keeping costs minimized than any other aspect. One place I don't tend to skimp is on the top so my acrylic bills have been high on even a cheap (as in used) tank. The tank opening you display is ideal for making an aesthetic top and you have a number of options. There is a stuck thread call "HOW TO ...) that has a couple of topics listed and links to threads discussing the topics (ie the information is not in the stuck thread, it is only a cross reference). Both lids and drilling have links.
DIY Lids
Note any time you cut acrylic, SAND every surface that will come in contact with an animal or your hand or arm. Cut acrylic is very sharp and 15 minutes of sanding will help keep the red stuff in your body and the blue in the octo's.
My favorite method is to line the underside of each opening with thin acrylic strips, properly welded with acrylic cement. It will reduce your opening size so keep this in mind. I recommend attaching the strips around all 4 edges (to help prevent the lid from warping, not so much for support as 2" tabs would probably be enough. Diagonals at the corners might actually work well - I have not experimented - but could be a problem if they chip). The actual lid is sheet acrylic the same thickness as the top, cut to fit the opening (make a template BEFORE you add the supports and make one for each side, don't assume they are the same!) and when closed will be flush with the top of the tank. We drill the lids (using a peg board as a template to make nice evenly spaced rows) to allow heat escape and minimize warping caused by the dry top side and damp underside.
This kind of lid does not need a hinge but I prefer to have it open rather than having to remove it and find it again so we use a soft acrylic hing on the back. A hing may be more trouble than it is worth if you have a hood that interferes.
You will need some kind of handle since the top is flush with the tank. If you drill the tank, a simple (but ugly) solution is to thread a zip tie through two of the holes. If the lids are fairly large (a foot or more) then something rigid glued or taped (I have used automotive two side tape with some success but it eventually has to be replaced after a couple of years). For our largest octo tank, I have a square 1" acrylic bar attached to the largest center lid that extends about 2" beyond the opening for ease of use.
You will need to lock the lids when you have an octopus in residence. I use an acrylic hasp latch and attach them in various ways (I also use two large marble book ends on one tank). The hasps work well with flat or 90 degree surfaces but not so well for uneven connections. Sadly I learned recently that you MUST USE the latches when you have an animal in the tank. We had been in the habit of not latching the covers on the large tank as we had never had a resident that showed interest in the air space above the water ... until we found Margay in another room, half way down the stairs. We did not find her alive.
Drilling
I have one bottom drilled tank and one low drilled tank and will never have another tank that is not side or back drilled. Leaks are fixable in side or back drills, you have to empty the tank if anything leaks underneath. Additionally, water can only empty to the bulk head (a stand pipe in a bottom drilled tank minimized the possibility of a total drain or at least slow it down to a drip). Ideally, if you have room to lower your water level about 2" from the top of the tank, this will help to keep the octopus from exploring ways to escape (but as noted above it is not a guarantee). Most tanks are drilled with less air space. Since this is a freshwater tank as it comes from the manufacturer you will also want to create a weir around the bulkhead, again something easier to do with acrylic but silicone will work on both. Depending upon your pocketbook they have some nice new designs (I saw some in videos of this year's MACNA but have not seen them in the stores) that are easier to clean. The one in the linked photo is typical of a back or side drill installation. I recommend buying one over making one as the teeth are really, really hard to cleanly cut. Googling aquarium weirs or overflow boxes will give you some ideas (probably more than you want but this is the one I would look into if I started a new tank today).
Speaking of water levels, in case I have not mentioned it, the amount of water that can drain from your tank with the power off is a consideration of how high the water is maintained in your sump so expect to fill it only about 2/3 of the way when you are determining your pump level for your skimmer. We mark our high level with a sticker that helps both to keep the evaporation minimized (you will have to top the tank off with fresh water on a regular basis in addition to more frequent water changes than you may be accustomed to) AND allow for power outage back drain (The last photo in this post shows an example).
Similar threads
- Replies
- 3
- Views
- 371
Shop Amazon
Shop Amazon; support TONMO!
We are a participant in the Amazon Services LLC Associates Program, an affiliate program designed to provide a means for us to earn fees by linking to Amazon and affiliated sites.